Android Native Programming C/C++ with OpenCV
17 Apr 2015Introduction
This article describes how to setup Eclipse for using C/C++ OpenCV Programs together with Java in Android projects.
Installation and Code Compilation
Before Proceeding make sure that you have all the below software components installed and configured in Eclipse
To develop your application via Eclipse, you need to install the following softwares.
- Java Development Kit 7+ (JDK)
- Eclipse, the “Eclipse IDE for Java Developers” .
- Android SDK
- Android Development Tools for Eclipse, aka ADT Plugin.
- Update site: https://dl-ssl.google.com/android/eclipse/
- Detailed instructions can be found at
- Android NDK
- The NDK is a toolset that allows you to implement parts of your app using native-code languages such as C and C++
- It can be downloaded from http://developer.android.com/tools/sdk/ndk/index.html
-
Eclipse CDT for C/C++ support - Install CDT from Eclipse update site http://download.eclipse.org/tools/cdt/releases/indigo.
-
OpenCV 2.4.3 precompile libraries - https://github.com/pi19404/OpenCVAndroid/blob/master/opencv_arm_libs.tar.gz
- OpenCV sources Get the OpenCV Sources from github repository https://github.com/Itseez/opencv.git
Configuring Eclipse Configure eclipse to set the path for Android SDK and NDK
- Eclipse -> Window -> Preferences -> Android -> set path to SDK
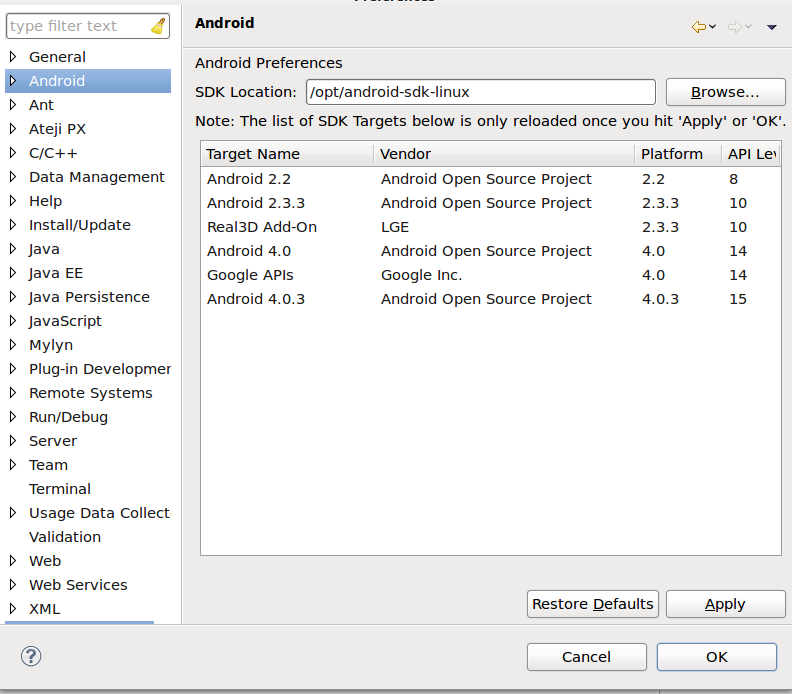
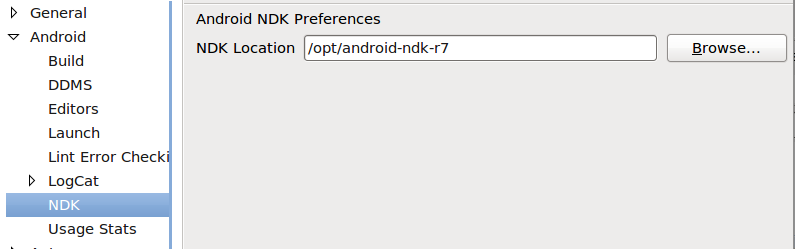
- Eclipse -> Window -> Preferences -> Android -> NDK -> set path to the NDK
Android Project
- In Eclipse create Android project to which you want to add C/C++ code
For this examples a project called
AndroidOpenCV_v1has been created
Setting up for Cross Compilation
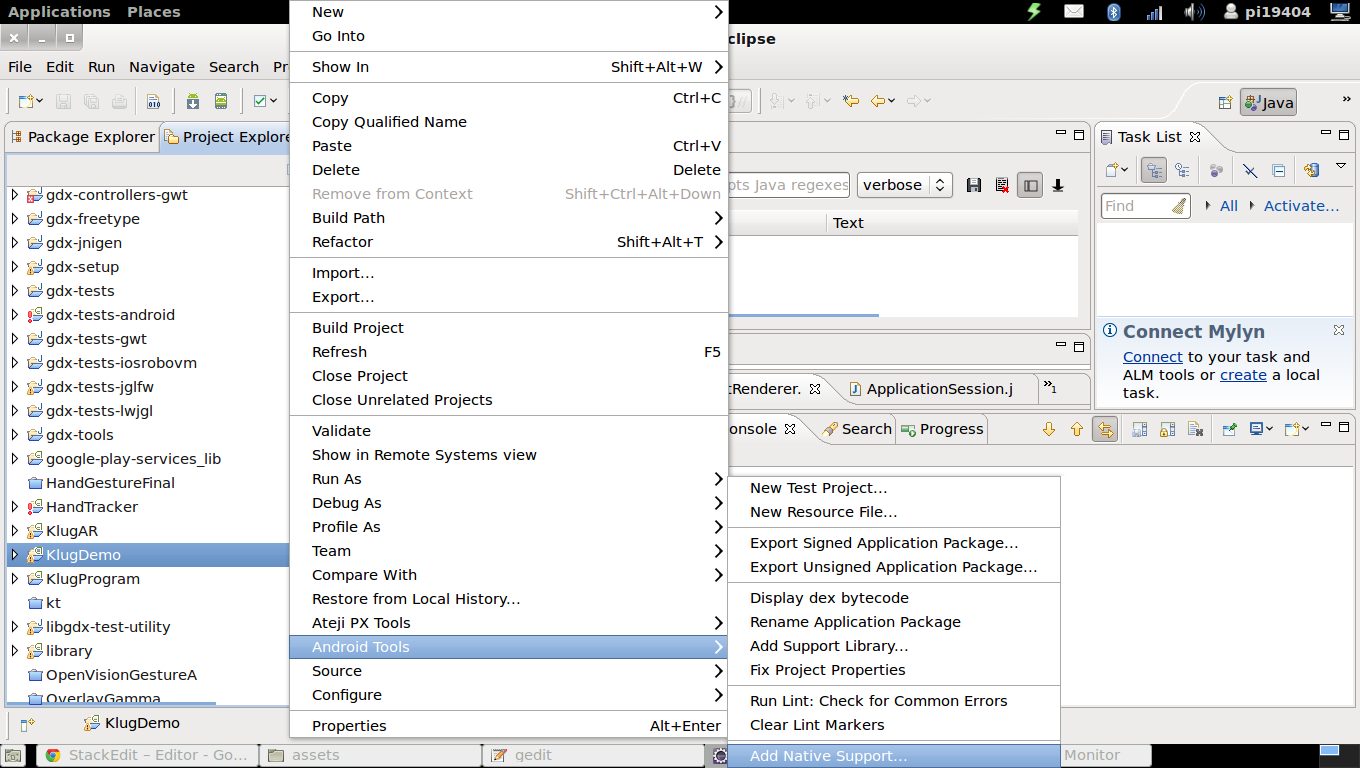
- The Eclipse IDE provides features for adding native C/C++ support to an existing Android based project.
- Right click on an Android project and select
Android Tools -> Add native supportor Select the optionFile->New->Otherfrom main menu) and selectConvert to a C/C++ Project.
- Enter the desired library name : In the present article we enter the name as
OpenVision
This will configure the Android Project for the native build.
- You will be able to see additional options related to native build
- C/C++ build
- C/C++ general
- CDT builder option in
Project Properties->Buildersmenu
configure C/C++ compilation for android build
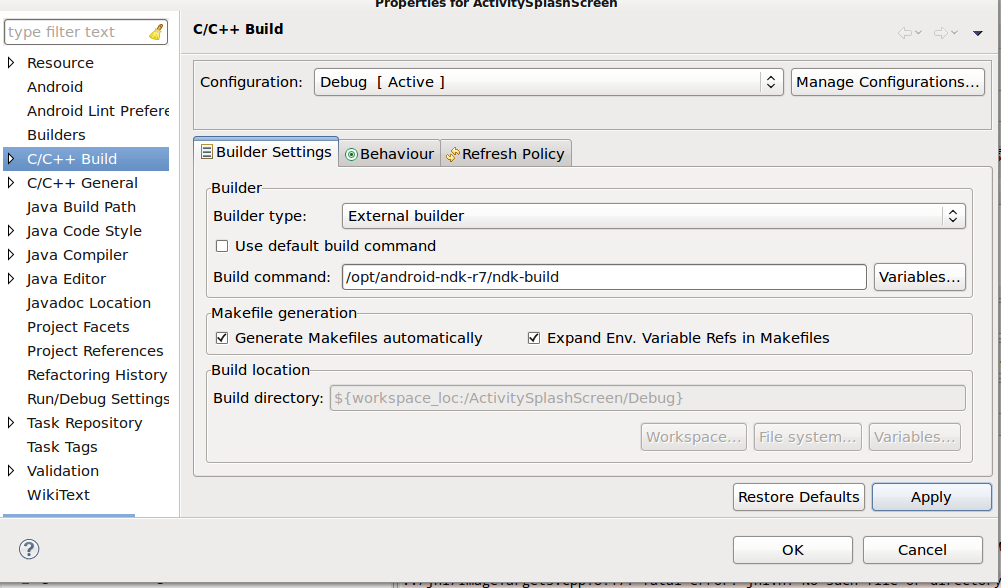
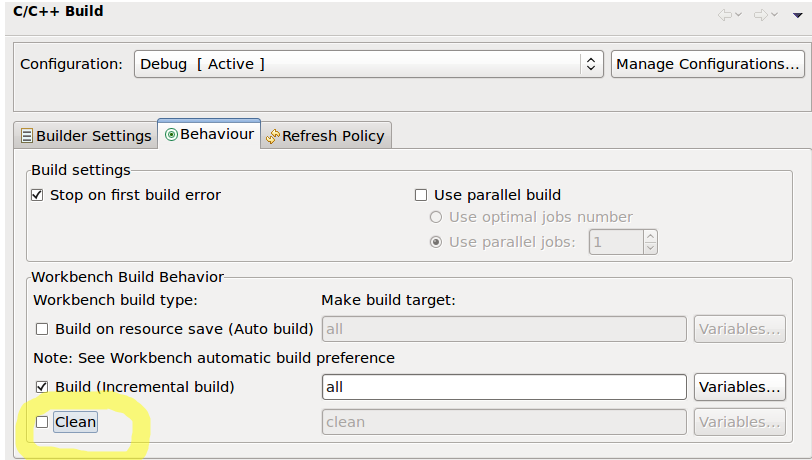
- In the project properties Choose
C/C++ Buildoption - uncheck Use default build command and configure ndk-build as a build command
- ndk-build script must be in your path or specify absolute path
- In Behaviour setting uncheck clean (ndk-build cleans project automatically on build and removes all existing libraries from libs/armeabi folders)
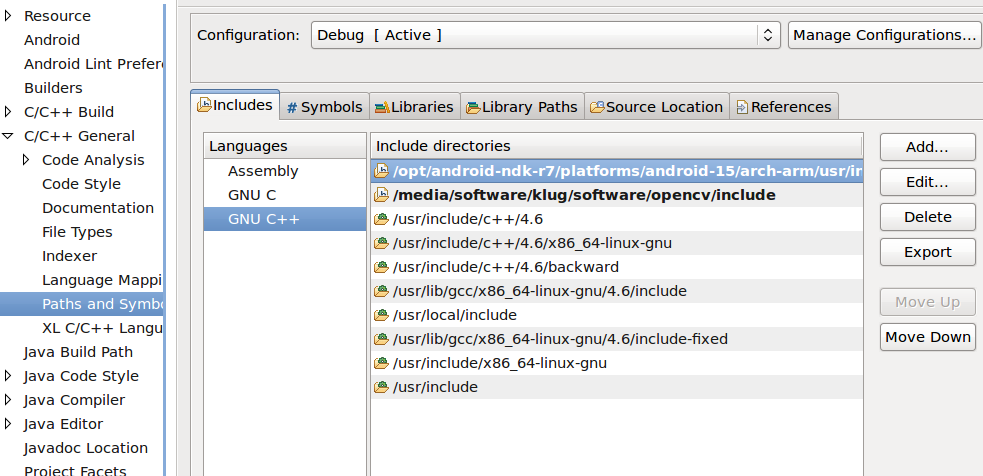
Configure the include paths
- Choose C/C++ General->Paths and Symbols and configure include path
- Add path to include directory which is located in
/opt/android-ndk-r7/platforms/android-15/arch/arm/usr/includesubdirectory which contains Android ndk toGNU CandGNU C++include paths. - Kindly note that Include path depends on target for which you are compiling (android-15 in my case — i.e. Android 4.0.3)
- We also need to include the paths to opencv include directory
Code
We will run a OpenCV based faced detection algorithm using OpenCV on the camera frames provided by AndroidCamera
-
The native code C/C++ consists of
haarcascade_test.cppfile which provides a high level interface tohaarcascadeclass which run the face detection algorithm on downsampled version input frame and draws a Circle in the ROI the face is detected. -
The frames from camera are obtained using android API calls which is then passed to OpenCV for processing which is implemented in C/C++ and the output frame is passed back to android java code for rendering
-
Create a jni subdirectory with main file
OpenVision.cppfile and associatedAndroid.mkandApplication.mkmake file Android.mkfile.This file is like a standard make file containing the include paths,source files,library dependencies etc.Few of the syntaxes are specific to android build and explanation is provided in the comments-
Application.mkfile contains flags related to target,platform as well as additional compilation and link flags - Create/Copy all of the following files in the jni directory
- haarcascade_test.cpp
- haarcascade_test.hpp
- Android.mk
- Application.mk
-
copy the precompiled OpenCV libraries required for the build to
libs/armeabi2directory. - We can now build the project which will trigger the native build and create a shared library
libOpenVision_naive.soin thelibs/armeabiandlibs/areabi-v7adirectories and all the OpenCV 3rd party libraries are also copied from thelibs/armeabi2directory tolibs/armeabiandlibs/armeabi-v7adirectories.
However this cannot be directly called from java code since we have not configured JNI interface.
Java JNI Interface code
- Java Native Interface (JNI) enables code written in Java to access (bind to) code written in C/C++ (and vice-versa) thereby allowing developers to gain access to low-level OS APIs, reuse legacy code, and possibly even boost the execution performance.
The java code for JNI Interface is as below
public class ProcessImage {
public static String APPLICATION_DIR=Environment.getExternalStorageDirectory().getAbsolutePath()+"/Android";

    	static {
    	    //loading native and dependent 3rd party libraries
    		System.loadLibrary("opencv_core");
    		System.loadLibrary("opencv_imgproc");
    		System.loadLibrary("opencv_highgui");
    		System.loadLibrary("opencv_objdetect");
    		System.loadLibrary("OpenVision_native");
    		}


        public ProcessImage() {
 initDetector(APPLICATION_DIR+"/haarcascade_frontalface_alt.xml");
        }

        public native int run(int width, int height, byte yuv[], int[] rgba);
        public native void initDetector(String name);

}
- The function that are required to be called by java are declared as
nativeand their implementation is found in C/C++ files. - We also need to load the native library in this case
libOpenVision.soin the java code which is performed bySystem.loadLibraryfunction call.
Generate Header Files
- We must now generate header files for JNI interface.
-
Compile the android Project .This will generate the class file for
ProcessImage.javafile in thebin/classesdirectory javahis a JDK tool that builds C-style header files from a given Java class that includes native methods- Run the
javahcommand withjniswitch to generate the JNI Interface files with classpath including thebin/classesdirectory
cd jni
javah -jni -classpath `pwd`/../bin/classes -jni com.example.androidopencv_v1.ProcessImage
-
This will generate the header file
com_example_androidopencv_v1_ProcessImage.hin thejnidirectory -
Now we modify the file so that it calls the routines defined in the native calls
-
The function declarations in header files are of the form
JNIEXPORT void JNICALL Java_com_example_androidopencv_1v1_ProcessImage_initDetector
  (JNIEnv * env, jobject obj, jstring javaString)

JNIEXPORT jint JNICALL Java_com_example_androidopencv_1v1_ProcessImage_run
  (JNIEnv *, jobject, jint, jint, jbyteArray, jintArray)
Native Method Arguments
JNIEnv *env, an interface pointer (pointer to a pointer) to a function table, where each entry in the table is a pointer to a function that enables Java-to-C/C++ integration.-
The second argument is typically of type
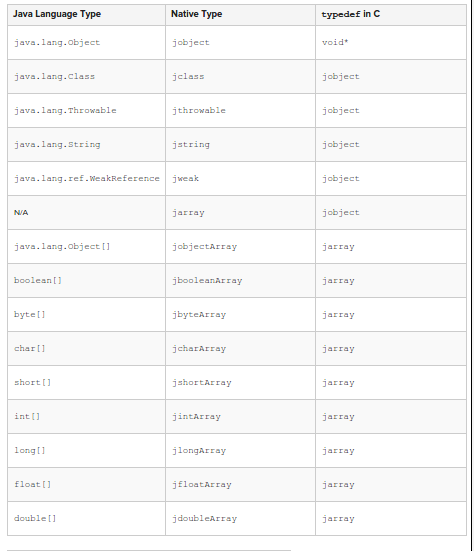
jobject obj, which is a reference to the object on which the method is invoked for In case of instance methods and ` jclass clazz`which is a reference to the class in which the method is defined in case of static methods. - C/C++ primitives vary in size, depending on the platform while java primitives are well defined.
-
To provide inter-operability with C/C++, jni.h defines the following between standard java and C/C++ primitives (taken from https://thenewcircle.com/s/post/1292/jni_reference_example)
- The JNI includes a number of pre-defined reference types (passed as opaque references in C) that correspond to different kinds of Java object types:

- All objects passed to native code and returned from JNI functions are considered local references .Thus datatypes like arrays,strings need to be accessed via a accessor functions provided by JNI.
//access string
const char *name = (*env)->GetStringUTFChars(env, javaString, 0);

//access integer array
jint *_yuv = env->GetIntArrayElements(array, NULL);

//access byte array
jbyte* _bgra=env->GetByteArrayElements(oarray,NULL);
when the accessed data is no longer required we need to free the data
//release memory taken by UTF string locally
env->ReleaseStringUTFChars(javaString, name);

//release memory take up by integer array _yuv
env->ReleaseIntArrayElements(array, _yuv, 0);

//release memory take by the byte array _bgra
env->ReleaseByteArrayElements(oarray, _bgra, 0);
- Also we will be including the header file in
OpenVision.cppfile.Thusg++will be used for compilation of the code . If the code is included incfile thengccwill be used for compilation - Kindly note that the syntax for extracting data from JNI datatypes differ are different for C/C++ functions.
Building the project
After building the project the libOpenVision.so files can be found in the libs/armeabi and libs/armeabi-v7a directories.These have been cross-compiled for use on android based devices.
These can now be loaded and called from java application using JNI Interface
    	static {
    	    //loading native and dependent 3rd party libraries
    		System.loadLibrary("opencv_core");
    		System.loadLibrary("opencv_imgproc");
    		System.loadLibrary("opencv_highgui");
    		System.loadLibrary("opencv_objdetect");
    		System.loadLibrary("OpenVision_native");
    		}
-
The
System.loadLibraryfunction call is used to load the native libraries. -
The native functions can be called as standard java functions
ProcessImage opencvp=new ProcessImage();

//initializes the face detector
initDetector(APPLICATION_DIR+"/haarcascade_frontalface_alt.xml");

//android camera call back function,where data is returned as  byte array
public void onPreviewFrame(byte[] data, Camera camera)
{

// mDrawOnTop.mImageWidth - image width
//mDrawOnTop.mImageHeight - image height

//allocate memory for output bitmap data
 mDrawOnTop.mRGBData = new int[mDrawOnTop.mImageWidth * mDrawOnTop.mImageHeight];

//allocating and copying byte array
mDrawOnTop.mYUVData = new byte[data.length];
System.arraycopy(data, 0, mDrawOnTop.mYUVData, 0, data.length);

//calling the native function
opencvp.run(mDrawOnTop.mImageWidth, mDrawOnTop.mImageHeight, mDrawOnTop.mYUVData, mDrawOnTop.mRGBData)

}
Code
The android project can be found at adroid/AndroidOpenCV_v1 subdirectory of https://github.com/pyVision/root github repository